With ConfigServer Firewall (CSF) installed for our server, we can utilise Login Failure Daemon (LFD), to setup a server cluster. LFD tracks and records all attempts to brute force services on our server such as FTP, Mail, etc by scanning log files for failed authentications and then blocks the IP address. The IP addresses are stored in /etc/csf/csf.tempban for temporary bans or /etc/csf/csf.deny for permanent bans. If an IP address is whitelisted it is stored in /etc/csf/csf.allow file.
You can manage these files yourself either through the CSF GUI interface or via the command line using your favourite text editor. This would be fine if you have just one or maybe two servers but if you had more you would need to log into each server with CSF and update the blocklists manually, which would be very time-consuming. Instead of replicating each of the files individually to each server we can use a feature of CSF where the servers will share and update the files automatically. Therefore, if server1 has a brute force attempt made from an IP address, it will immediately forward that IP address to server2, server3 and server4 and the IP will be blocked on all your servers, not just server1. This is known as an LFD Cluster.
In this guide, we will show you how to set up a LFD Cluster to enable group sharing of your white and blacklists. With CSF being the same software between different control panels, this guide is applicable to DirectAdmin, cPanel and CyberPanel.
Configuring the Server
In order to configure our servers, we will need to edit the CSF configuration file /etc/csf/csf.conf. Usually, we could do this directly in CSF using the GUI, however, these are classed as restricted UI options meaning they can only be edited using the command line in DirectAdmin and CyberPanel or if you are using cPanel you can use ConfigServer Explorer which provides a Filesystem explorer directly in WHM. For the purposes of this guide, we will be using the command line.
Firstly, we need to obtain the IP addresses of all servers that will be participating as cluster members. For illustration, we will be using 192.168.0.1 and 127.0.0.1 as our example. You will, of course, need to substitute these IP addresses for your own.
Set Cluster IP Addresses
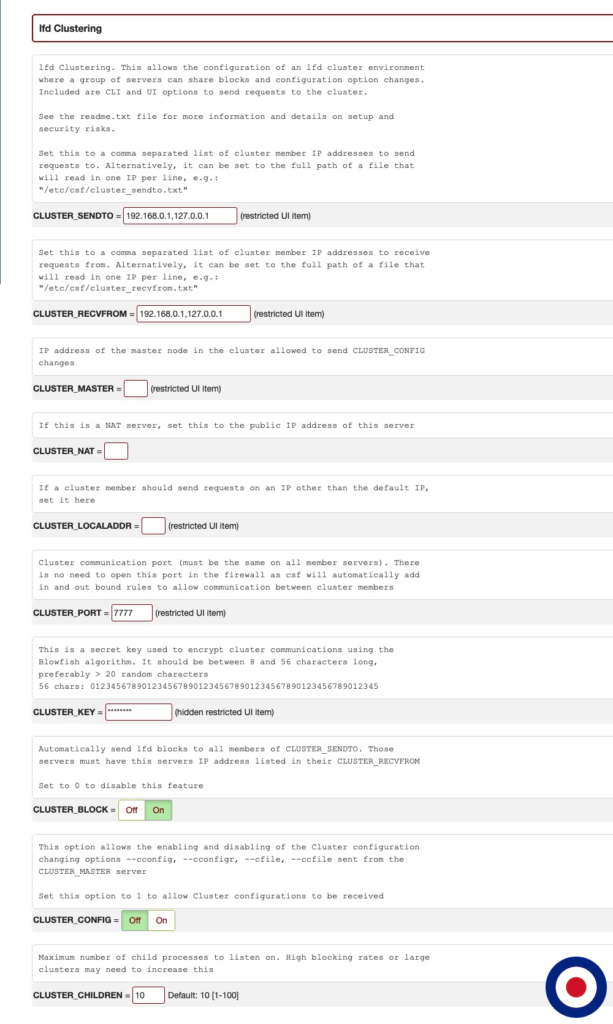
Now we need to edit the CSF configuration file to add the IP addresses of our server in the CLUSTER_SENDTO = “” and CLUSTER_RECVFROM = “” sections.
perl -pi -w -e "s/CLUSTER_SENDTO = \"\"/CLUSTER_SENDTO = \"192.168.0.1,127.0.0.1\"/" /etc/csf/csf.conf
perl -pi -w -e "s/CLUSTER_RECVFROM = \"\"/CLUSTER_RECVFROM = \"192.168.0.1,127.0.0.1\"/" /etc/csf/csf.conf
We have now created a network using CSF where each of the listed IP addresses will be become members of the CSF cluster and be able to send and receive white and black lists.
Set Cluster Block
Now we need to check the CLUSTER_BLOCK section to ensure it is set to on (CLUSTER_BLOCK = “1”). We can check this by using the following command:
grep -w '^CLUSTER_BLOCK' /etc/csf/csf.conf
If the CLUSTER_BLOCK returns a 0 (off) instead of 1 (on), you can use the following command to change it:
perl -pi -w -e "s/CLUSTER_BLOCK = \"0\"/CLUSTER_BLOCK = \"1\"/" /etc/csf/csf.conf
Set Cluster Port
Now we need to set the CLUSTER_PORT. This port is how our cluster members will communicate with each other. The default setting is CLUSTER_PORT = “7777”, however, if you decide to change it you will need to update the port on every cluster member. You can check the current CLUSTER_PORT using this command:
grep -w '^CLUSTER_PORT' /etc/csf/csf.conf
If you have changed the port number you can use this command to update the configuration file:
perl -pi -w -e "s/CLUSTER_PORT = \"7777\"/CLUSTER_PORT = \”NEW-PORT-NUMBER\”/" /etc/csf/csf.conf
Set Cluster Key
The CLUSTER_KEY is a secret key which is responsible for ensuring all communications between our cluster members is encrypted using the Blowfish algorithm. The key needs to be a minimum of 8 and a maximum of 56 characters long. The CSF team recommend a minimum length of 20 characters, however, we would recommend that the key is the maximum length of 56 characters.
For example, a randomly generated key using 56 characters would look similar to this 56681689651354229616644831765284737371348268199929918797
Important
This cluster key is for illustration only and not to be used in a production environment. Please generate a new key for your installation.
To add our CLUSTER_KEY to the CSF configuration file we would use the following command:
perl -pi -w -e "s/CLUSTER_KEY = \"\"/CLUSTER_KEY = \"56681689651354229616644831765284737371348268199929918797\"/" /etc/csf/csf.conf
Important
In order to set-up LFD Clustering on all servers you will need to repeat the steps above on each server we want to include in the cluster.
The completed LFD Clustering section in the /etc/csf/csf.conf file should now look like the image below.

Restart CSF/LFD
We have now finished editing the /etc/csf/csf.conf file so we need to restart CSF/LFD to ensure our changes take effect. We can restart CSF and LFD using the following commands:
csf -r
service lfd restart
Test the LFD Cluster
Now we have restarted CSF/LFD, we need to test our LFD Cluster to ensure all servers can communicate with each other. To test the cluster we will use the following command:
csf —cping
The output you will see in the command line session will be something similar to the example below. A successful connection between CSF will reply a [PONG!] message.
[root@csf-test ~]# csf --cping
Sent request to 192.168.0.1, replied: [PONG!]
Sent request to 127.0.0.1, replied: [PONG!]
That’s it. You have now successfully set up a ConfigServer Firewall (CSF) cluster to sync white and blacklists automatically.


