CloudLinux OS is designed to isolate each user account into a separate Lightweight Virtualized Environment (LVE), which partitions, allocates, and limits server resources, such as memory, CPU, and connections, for each user. This ensures that an individual user cannot jeopardise the stability of the server, causing all websites to either slow down or come to a complete halt. CloudLinux OS also cages (CageFS) users from one another to avoid security breaches. This way, unstable scripts or malware infected websites are not able to spread across your other user accounts and websites, causing severe harm.
CloudLinux OS is made up of several individual components which come together to improve the stability of your server. Below is a brief description of each component.
LVE Manager
LVE is the Lightweight Virtual Environment. LVE Manager allows you to maintain fine-tuned control over your resources, including CPU, IO, memory, inodes, numbers of processes, and concurrent connections, that any single account can use. It is lightweight and transparent. Now you can limit abusers while allowing good customers to use what they need.
CageFS
CageFS is a virtualized, per-user file system that uniquely encapsulates each customer, preventing users from seeing each other and viewing sensitive information. CageFS prevents a large number of attacks, including most privilege escalation and information disclosure attacks. It is completely transparent to your customers, without any need for them to change their scripts.
MySQL Governor
MySQL Governor tracks CPU and disk IO usage for every user in real time and throttles MySQL queries by using same-per-user LVE limits. By using the dbtop utility, it is possible to see usage as it happens on a per-customer basis, ensuring that system admins always know what is going on.
PHP Selector
The PHP Selector allows end users to select the specific version of PHP they need. It allows ultimate flexibility by offering all popular versions of PHP, with more than 120 PHP extensions to choose from.
Ruby Selector
The Ruby Selector allows end users to choose the Ruby version for applications and install additional modules (gems) to the application environment. Ruby Selector uses mod_passenger for optimum performance.
Python Selector
The Python Selector allows end users to choose the Python version as an application and install additional modules. Python Selector uses mod_passenger to get the best performance from Python applications.
Node.js Selector
Node.js Selector is a CloudLinux component that allows each user to easily create Node.js applications, choose Node.js version and other parameters for applications based on their needs.
Apache mod_lsapi PRO
Mod_lsapi PRO is the fastest and most reliable way to serve PHP pages. It is a drop-in replacement for SuPHP, FCGID, RUID2, and ITK. It has a low memory footprint and understands PHP directives from .htaccess files.
Note
The Mod_lsapi PRO option should not be installed on a server that already has Litespeed or OpenLiteSpeed installed as it already uses PHP LSAPI.
Reseller limits
Reseller limits is a feature that allows you to set resources limits for the each individual reseller. This component provides control to the reseller account to allocate resources and the ability to set limits to each of the reseller’s end users within the Reseller Interface. Reseller limits set the total amount of resources resellers’ end users can consume together.
LVE-Stats 2
LVE-Stats 2 collects LVE usage statistics (CPU, memory, disk space usage) and allows to query the data.
Important
It is recommended to install or have DirectAdmin installed on your server before converting to CloudLinux OS. The CloudLinux OS installation script will automatically detect the environment, virtualization, control panel and any specific hardware which might require additional drivers to be installed.
In this guide, we will show you how to install CloudLinux OS and enable CageFS when using OpenLiteSpeed with DirectAdmin. We will also test CageFS to ensure it has been successfully installed and that each user is installed inside the virtualized caged file system.
Install CloudLinux
Before installing CloudLinux on your DirectAdmin server, you will need to download the CloudLinux deploy script using the following command.
wget https://repo.cloudlinux.com/cloudlinux/sources/cln/cldeploy
Note
In order to install CloudLinux you will need to be logged into your preferred SSH console application and have root level access in order to install CloudLinux.
Install with Activation Key
To deploy the CloudLinux installation script using an activation key simply use the following command.
sh cldeploy -k
Note
You will need to replace sh cldeploy -k 626498-CLO-63qetS3lZPLzzeVjQvoNPCJod2jtJu18. The key used in this guide is a dummy is used for illustration purpose and will not work.
Install with IP Based Licence
To deploy the CloudLinux installation script using an IP based licence use the following command.
sh cldeploy -i
Reboot
After the installation script has finished, the server needs to be rebooted. This will ensure that the CloudLinux kernel is installed, which is specifically crafted for the LVE support and limits operation. You can reboot the server using the following command.
reboot
After rebooting the server you will need to verify that CloudLinux has been successfully installed using the following command.
cat /etc/redhat-release
If CloudLinux has been successfully installed you will see the following message.
[demo@vpsbasics] ~ # cat /etc/redhat-release
CloudLinux release 8.2 (Yury Malyshev)
If CloudLinux has not been installed successfully you will see the following message and will need to reinstall using the CloudLinux delay script.
[demo@vpsbasics] ~ # cat /etc/redhat-release
CentOS Linux release 8.2.2004 (Core)
That’s it. You have successfully converted your server and installed CloudLinux OS.
Enable CageFS with OpenLiteSpeed
Now before installing the various CloudLinux components such as CageFS, MySQL Governor and PHP Selector we will need to enable CageFS support in OpenLiteSpeed. When using OpenLiteSpeed with DirectAdmin you will have noticed that access to the OpenLiteSpeed admin panel is set to read only and you cannot change or edit any settings using the GUI. The reason for this is due to the way the DirectAdmin integrates OpenLiteSpeed. Usually the OpenLiteSpeed configuration file is one file but DirectAdmin splits this configuration file into multiple include files stored in the /usr/local/lsws/conf directory.
The option to enable CageFS in OpenLiteSpeed is located in the file called httpd-defaults.conf. We could just edit this file directly but when OpenLiteSpeed is updated this file will be updated also and any changes you have made with be will overwritten.
Therefore, we will make a copy of this file and add it to the custom folder so when OpenLiteSpeed is updated the option to enable CageFS will remain. To copy the httpd-defaults.conf file you can use the following commands.
cd /usr/local/directadmin/custombuild/
mkdir -p custom/openlitespeed/conf
cp -p configure/openlitespeed/conf/httpd-defaults.conf custom/openlitespeed/conf/
Now we will need to edit the httpd-defaults.conffile to change the enableLVE option using the following command. In our example we use the nano text editor.
nano /usr/local/directadmin/custombuild/custom/openlitespeed/conf/httpd-defaults.conf
Once the file is opened scroll down to the enableLVE and change the option to number 2 which will enable CageFS.
enableLVE 2
Note
The enableLVE command has four different option values which are; enableLVE 0 (Disable), enableLVE 1 (LVE), enableLVE 2 (CageFS) and enableLVE 3 (CageFS without suEXEC). This basically means that LVE doesn’t include CageFS by default. If you plan to install both CageFS and LVE then you choose option 2. If you will only install LVE with CageFS then you should choose option 1.
Once you have added the CageFS option you will need to rewrite the existing virtualhost configuration files and restart OpenLiteSpeed using the following command.
cd /usr/local/directadmin/custombuild/
./build rewrite_confs
That’s it. You have successfully enabled CageFS support in OpenLiteSpeed. Now you can move onto installed the various CloudLinux Components.
Install CloudLinux Components
Now we will need to install the various CloudLinux components; LVE Manager, CageFS, MySQL Governor, PHP Selector, Ruby Selector, Python Selector, Node.js Selector and LVE-Stats 2 you will need to log into your DirectAdmin server. On the dashboard you will now have a new icon called CloudLinux LVE Managerunder Extra Features section.
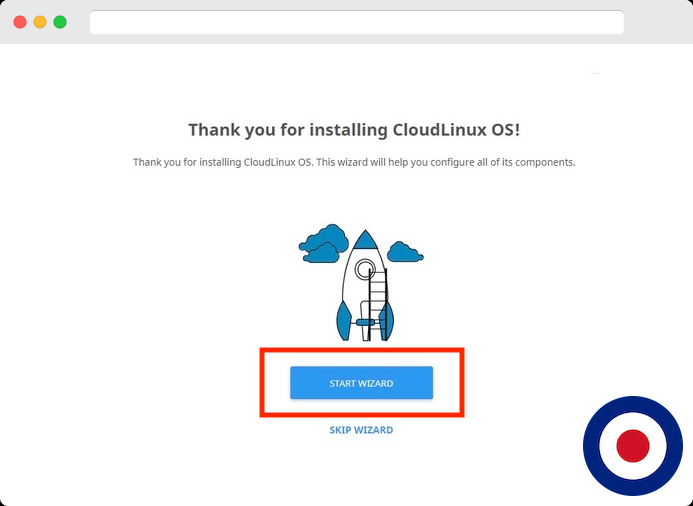
When you open the CloudLinux LVE Manager you will be presented with the CloudLinux Wizard screen. You can use the installation wizard to install the components or you can skip the wizard and install the components manually.
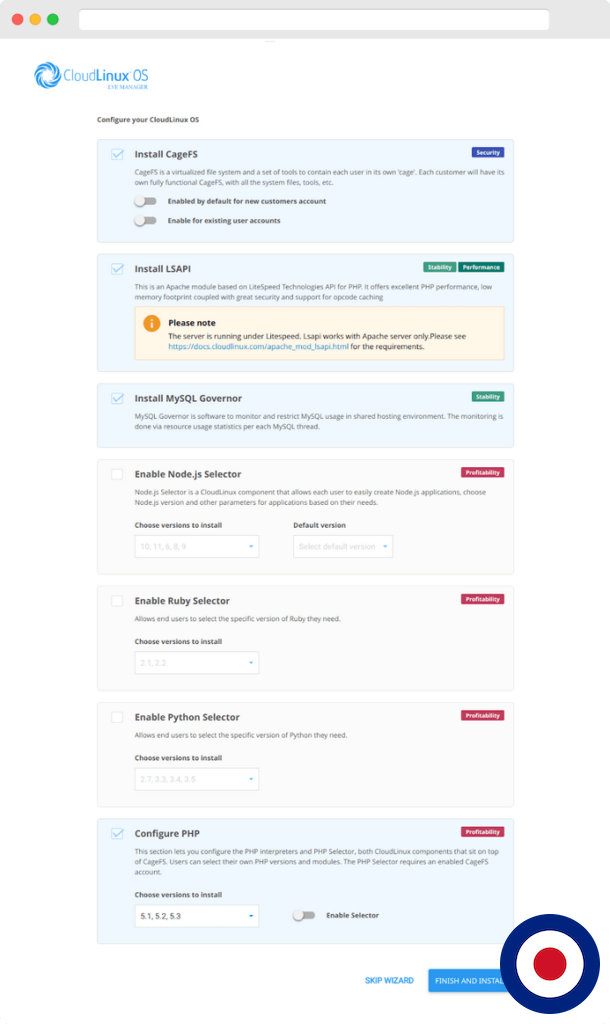
For the purposes of this guide, we will be using the wizard to install the components. After clicking the Start Wizard button you will be presented with the component screen that will enable you to configure CloudLinux OS.
Note
As you can see from the screenshot above, you will not be able to install PHP LSAPI as this has already been installed when using OpenLiteSpeed web server.
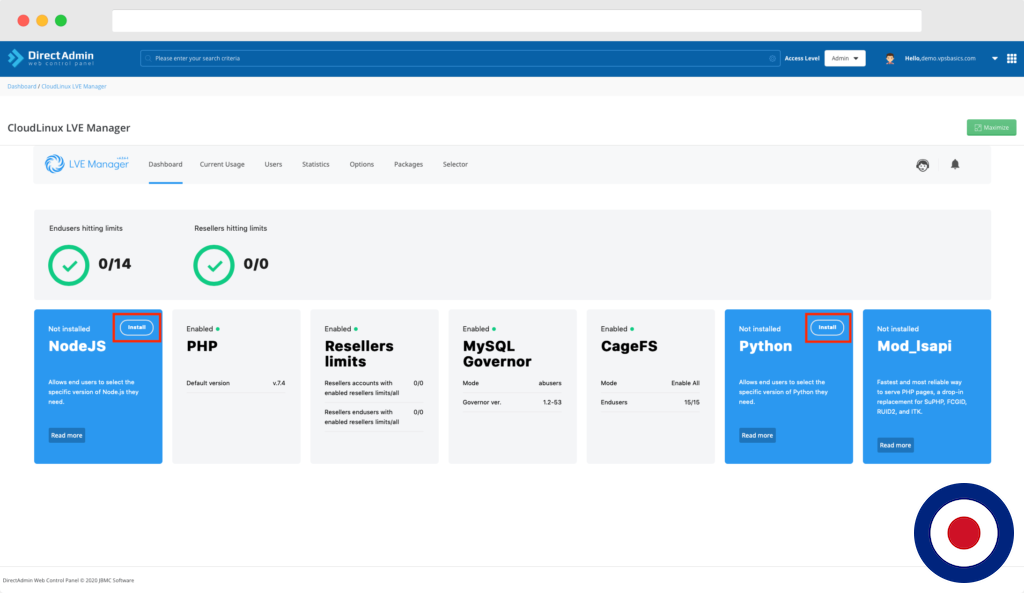
Once the wizard has completed installing the components the CloudLinux dashboard will be updated and the component will show Enabled . If you didn’t install some components when using the wizard you can install them directly from the dashboard by clicking the Install button.
That’s it. You have now successfully installed CloudLinux components such as LVE Manager, CageFS, MySQL Governor, PHP Selector, Ruby Selector, Python Selector, Node.js Selector and LVE-Stats 2.
Test CageFS with OpenLiteSpeed
Now you have enabled CageFS support within OpenLiteSpeed and installed the required CloudLinux components we can test the CageFS installation to ensure it is working correctly.
First we will need to create a small .txt file outside of the user home folder to use for the test. Using your preferred SSH console application, log into your server and create a file called test.txt using the following commands.
cd
mkdir tools
cd tools
echo "CageFS test" > test.txt
Now use the cat command which allows us to view the contents of file to ensure it has been created successfully.
cat test.txt
If successful the cat command will output CageFS test.
[demo@vpsbasics] ~ # cat test.txt
CageFS test
Now we will need to create a .php inside the users public_html folder. We will use the cat command which also allows us to create single file and create a file called test.php using the following commands.
cat > /home/EXAMPLE/domains/EXAMPLE.COM/public_html/test.php << 'EOF'

EOF
Important
Make sure you change EXAMPLE to the username and EXAMPLE.COM to the users’ main DirectAdmin website.
Now we will need to test access to the test.txt file using the following command.
curl -XGET https://EXAMPLE.COM/test.php
Important
Make sure you change EXAMPLE.COM to the users’ main DirectAdmin website.
If the CageFS integration into OpenLiteSpeed has failed you will receive the CageFS test message.
[demo@vpsbasics] ~ # curl -XGET https://EXAMPLE.COM/test.php
CageFS test
If the CageFS integration into OpenLiteSpeed was successful you will receive an unable to open file message.
[demo@vpsbasics] ~ # curl -XGET https://EXAMPLE.COM/test.php
Unable to open file!
That’s it. You have now successfully converted your DirectAdmin server with CloudLinux OS, enabled CageFS support within OpenLiteSpeed web server and tested CageFS to ensure it has been installed correctly and that each user is inside a virtualized caged file system.


