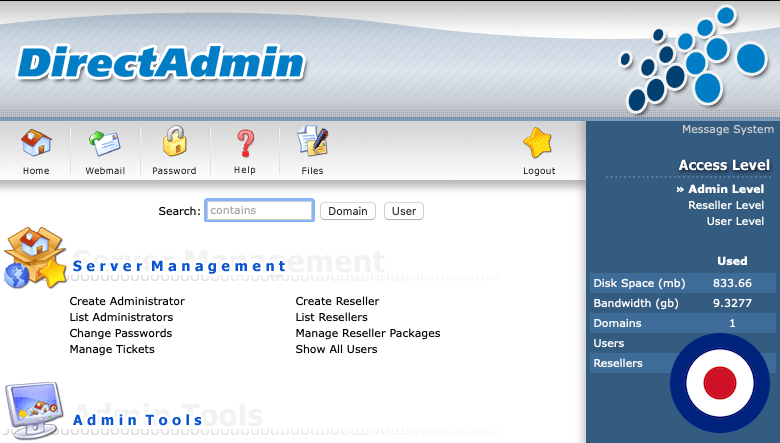
Since the announcement of the licence price increase by cPanel, the focus on finding another suitable web hosting control panel intensified. This resulted in a strong uptake in DirectAdmin usage. However one of the criticisms leveraged towards DirectAdmin was the overall look and usability of the panel. In the image below you can see the old theme called “Enhanced”.
In response the team over at DirectAdmin HQ worked hard to change the look and feel of the DirectAdmin dashboard. This resulted in the release of a new theme called “Evolution”. One of the biggest changes with the Evolution theme other than the immediately visual aesthetics, was to make it mobile and tablet friendly. In the images below you can see the standard and sidebar styles.
The DirectAdmin team has taken this a step further with the introduction of an icon based dashboard called icons grid built into the Evolution theme. There are now two distinct icon styles that you can choose from, classic and modern. In the images below you can see the difference between the two icon styles.
In this guide, we will show you how to install and customise the Evolution theme in DirectAdmin. We will enable the theme for all system users, customise the dashboard by removing icons and pointing them to an external support/billing platform. We will also customise the dashboard colours, logo and set a default theme.
Install the Evolution Theme
The Evolution theme became the default theme for all new DirectAdmin installations. If you are still using an older theme such as Enhanced, you can easily switch to the default Evolution theme, including the new login page. Simply log into your DirectAdmin dashboard as the Admin user and switch to Reseller user, then in Reseller Tools >> Skin Manager, select Evolution skin and click Set Global.
If you have existing accounts in your DirectAdmin control panel such as other Admins, Resellers and Users you can switch everyone to the Evolution theme with the following commands:
cd /usr/local/directadmin/data/users
perl -pi -e 's|skin\=enhanced|skin=evolution|g' ../admin/packages/*.pkg
perl -pi -e 's|skin\=enhanced|skin=evolution|g' */packages/*.pkg
perl -pi -e 's|skin\=enhanced|skin=evolution|g' */user.conf
perl -pi -e 's|docsroot\=./data/skins/enhanced|docsroot=./data/skins/evolution|g' */user.conf
That’s it. You have now successfully installed the Evolution theme to DirectAdmin dashboard and enabled it for all users (Admin, Reseller and Users). In the next section we will show you how to fully customise the look and feel of the Evolution theme.
Customise the Evolution Theme
One of the primary features of the new Evolution theme is that it’s been designed with complete flexibility in mind when it comes to theme customisations. You can change the sections visible, change the icons, you can even change the link location to each icon. This becomes even more important if you want to change the look and feel to match your own brand colours, logo, etc.
You can change everything about the theme directly from the DirectAdmin dashboard. No command line needed. Not only will this enable Admins to customise the look and feel of DirectAdmin but also Resellers and Users who can change the theme options from their own dashboard. Although Users don’t have the same level of customisation options as an Admin or Reseller user.
Change User Dashboard Options
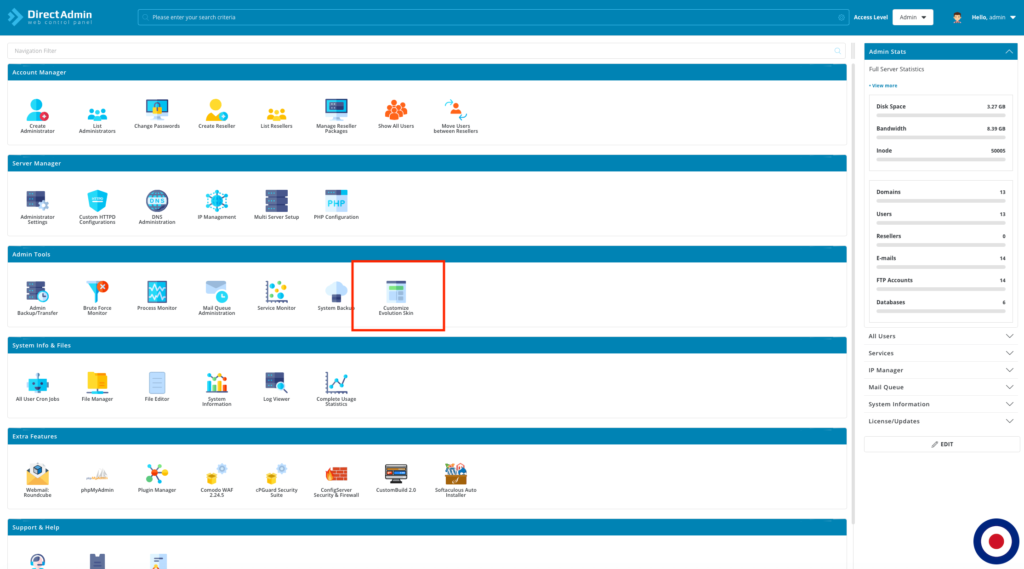
You can access the Customise Evolution Skin dashboard in the Admin Tools section. Select the Customise Evolution Skin icon or link (current theme dependant).
In the Customise Evolution Skin dashboard you will now see the different tab options. You can customise each users (Admin, Reseller and User) dashboard options using the tabs, Menu: User, Menu: Reseller and Menu: Admin. In these different user section you can customise the dashboard sections and icons that are visible to each user class.
Remove Dashboard Option
If you wanted to remove the Manage Tickets and Create Ticket options because you are using an external support ticket platform such as Blesta, WHMCS. You would select the Menu: Reseller tab and click on the Support & Help section.
This will open the Support & Help options, where you can Edit Category or Add Entry. To disable the Manage Tickets and Create Ticket options, select the Manage Tickets link under the Support & Help title. This will open the Edit Route option where you can change the route (link), Name and the Icon. Under Edit Route section you will see the Enabled option with a tick box. Simply uncheck the tick box. Move to Create Ticket and do the same. Then click the Save button.
Now, if you open the Reseller dashboard, under the Support & Help section you will see that the Manage Tickets and Create Ticket options have disappeared.
Note
If you change an option for a Reseller, for example remove the Manage Tickets and Create Tickets options you will also have to remove them for the users as well.
That’s it. You have now successfully removed the dashboard icons for Manage Tickets and Create Ticket and changed the dashboard icon links. In the next section we will show you how to change where the dashboard icon links to.
Change Dashboard Option Link
You can also use the Customise Evolution Skin dashboard to change the the where the dashboard icon links. For example, if you use your own billing platform such as Blesta or WHMCS, then you would like you clients to use this platform rather than the ticketing system built into DirectAdmin.
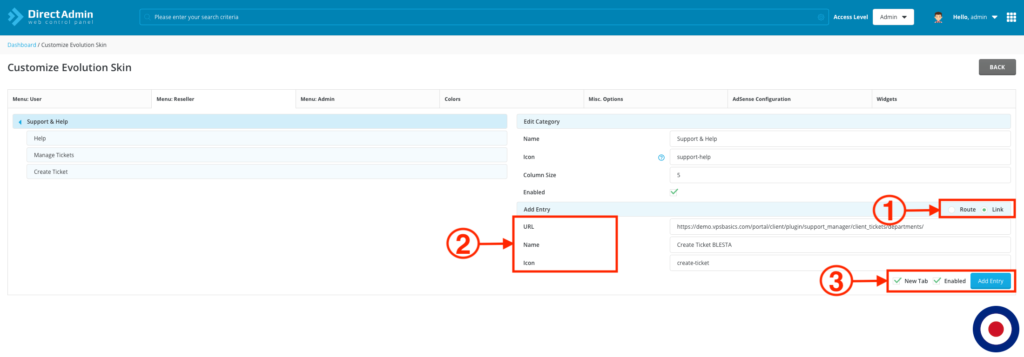
To change the icon links, select the Support & Help category which will open the Edit Category or Add Entry options.
In the Add Entry options change the radio button to Link. This will change the options enabled to URL, Name and Icon. In the URL options insert the URL for your Blesta or WHMCS ticket location. In the Name you can change this to anything you want, for example, Create Ticket or Open Support Ticket. You can use your own icon or the default DirectAdmin one, we would recommend that you keep with the DirectAdmin one for dashboard aesthetics. Once you have added the new entry click the Add Entry button to save.
Now, where you open the Reseller dashboard, under the Support & Help section you will see that the new Create Ticket icon added. Now when a user click the Create Ticket icon your own ticketing platform will open in a new window.
That’s it. You have now successfully edited the dashboard icon for Create Ticket to link directly to your own support platform. In the next section we will show you how to customise the dashboard colours.
Customise Dashboard Colours
You can adjust the colours used in the DirectAdmin by selecting the Colors tab. Here you can adjust the colours used for the Primary, Safe, Danger or Neutral colour options. To change the colour option, simply click the hex colour code and the dropdown menu will appear where you can adjust the hue, saturation, lightness and RGB value.
If you wanted to adjust the colours used for the dashboard header and section titles, you would need to select the Primary colour option. The default hex code used by DirectAdmin is #0083B4. If you wanted to change the colour to orange, you would need to change the hex colour code to #f26522 and then click the Save button. As you can see in the image below it has changed the dashboard header and section titles.
If you wanted to change back to the default colour option used by DirectAdmin, simply click the Reset in the top right corner. You will receive a Success message in the bottom right corner and the header colour will revert back to the default hex code #0083B4.
That’s it. You have now successfully customised the colours used in the DirectAdmin dashboard to match your brand colours. In the next section we will show you how to change the dashboard logo.
Customise Dashboard Logo
You can change the logo used in the DirectAdmin dashboard by selecting the Misc. Options tab. To upload your own logo to be used in the DirectAdmin dashboard click the X in the existing DirectAdmin logo. This will enable the upload logo option, simply drop your logo file in the box or click inside the box to upload your logo. Then click the Upload Logo button. Once your logo has uploaded to the DirectAdmin Customise Evolution Skin dashboard it will be displayed in the logo section. If you are using the sidebar layout you will need to also upload the logo under the Sidebar Layout Settings.
That’s it. You have now successfully uploaded your own logo to the DirectAdmin dashboard. In the next section we will show you how to customise the default user theme.
Customise Default User Theme
You can change the default theme layout used in the DirectAdmin dashboard by selecting the Misc. Options tab. Below the logo options you can select the default layout. Here you can choose between the Standard, Sidebar or Icons Grid layout options.
Under the default layout option you will see a check box that will disable the changing of the skins on the user level. By default it is not selected.
If you have selected the Standard theme option, the is an additional option called Standard layout default menu type where you can choose to display the navigation menu in a list or grid format.
The next option you can customise is the newly released Dark Theme or the standard Light Theme. In the image below you can see the Dark Theme using the icon grid layout with modern icons.
That’s it. You have now successfully changed the default theme used in DirectAdmin.
That’s the end of the tutorial explaining how to install and customise the Evolution theme in DirectAdmin. You have now successfully installed the Evolution theme and enabled for all users, removed icons from the dashboard and changed the dashboard icon links and customised the colours, logo and set the default theme used in the DirectAdmin dashboard.

