IPv6 is the most recent version of the Internet Protocol (IP), which provides an identification and location system for computers on networks and routes traffic across the Internet. IPv6 was developed to counter the long-anticipated problem of IPv4 address exhaustion as it contains a larger network of IP addresses and provides new features for network configuration management with support for future protocols changes.
An IPv4 address is 32-bit and looks something like 255.255.255.255, which allows 4.2 billion unique IP addresses but an IPv6 address is 128-bits and looks something like fddf:a3e0:2498:d053:0000:0000:0000:0001, allows for an enormous amount of unique IP addresses – 340 billion billion billion billion or 340,282,366,920,938,463,463,374,607,431,768,211,456 to be precise – which will mean with the widespread use and adoption of IPv6 will ensure we don’t run out of unique IP addresses anytime soon.
In this guide, we will show you how to enable IPv6 support in your DirectAdmin configuration file and then add an Individual IPv6 Address or Multiple IPv6 Addresses to a admin or reseller account. Also we cover how to assign the Individual or Multiple IPv6 Address to an admin or reseller and then how to add an IPv6 Address to an individual user and update the domains DNS records.
Enable IPv6 Support
For this guide we are assuming that you already have an IPv6 subnet routed to your server which has been preconfigured to enable IPv6 functionality and you are using the latest version of DirectAdmin.
DirectAdmin fully supports IPv6 Addresses and made several improvements in v1.37.0. You can check your DirectAdmin version using the following command.
/usr/local/directadmin/directadmin v
[root@vpsbasics ~]# /usr/local/directadmin/directadmin v
Version: DirectAdmin v.1.60.4
Before we start we will need to check if IPv6 is enabled on your server using the following command.
grep 'ipv6' /usr/local/directadmin/conf/directadmin.conf
[root@vpsbasics ~]# grep 'ipv6' /usr/local/directadmin/conf/directadmin.conf
ipv6=1
If the output is ipv6=1 you have IPv6 enabled in DirectAdmin. If the output is ipv6=0 or doesn’t return a value then IPv6 is not enabled in DirectAdmin. You can add IPv6 support using the following command.
/usr/local/directadmin/directadmin set ipv6 1
service directadmin restart
Now we will need to check DirectAdmin and its services to ensure they has been complied with IPv6 support using the following commands.
cd /usr/local/directadmin
./directadmin o
[root@vpsbasics ~]# cd /usr/local/directadmin
[root@vpsbasics directadmin]# ./directadmin
Compiled on 'CentOS 7.0 64-Bit'
Compile time: Feb 27 2020 at 11:17:09
Timestamp: '1582827364'
Compiled with IPv6
gettext support: no
If the output say Compiled with IPv6, it means that DirectAdmin is setup ready for IPv6. Now you will need to check to make sure DirectAdmin is listening on IPv6 port 2222 using the following command.
netstat -lnp | grep 2222
[root@vpsbasics directadmin]# netstat -lnp | grep 2222
tcp6       0      0 :::2222                 :::*                    LISTEN      10509/directadmin
The output above means DirectAdmin is bound to IPv6 and listening on port :::2222 and ready to allow connections on both IPv4 and IPv6 addresses.
Apache, Dovecot and PureFTPd support IPv6 out of the box and there is no need for changes. Although Exim supports IPv6 you will need to ensure it has been complied with IPv6 support using the following command.
/usr/sbin/exim -bV | grep Support
[root@vpsbasics ~]# /usr/sbin/exim -bV | grep Support
Support for: crypteq IPv6 Perl OpenSSL move_frozen_messages Content_Scanning DKIM DNSSEC Event OCSP PRDR SPF TCP_Fast_Open Experimental_SRS
The output above shows that Exim has been complied with IPv6. If you don’t see IPv6 in the output, you will need to recompile Exim, either using rpms, or from source.
That’s it. You have successfully enabled IPv6 support in DirectAdmin and checked to ensure all services can communicate over the IPv6 protocol. Next we will show you how to add an IPv6 Address to your DirectAdmin server and assign it to a reseller.
Add IPv6 Address
Note
If you want to generate any number of random IPv6 address from your assigned subnet quickly and easily you can use the IPv6 Address Generator script in our guide, How to Configure and Assign IPv6 Addresses in CentOS.
Individual IPv6 Address
To add an IPv6 Address to DirectAdmin, firstly log into the dashboard. Once you have logged in, select IP Management from the admin level dashboard options.

This will load the IP Manager dashboard. Select the ADD IP in the top right of the screen.
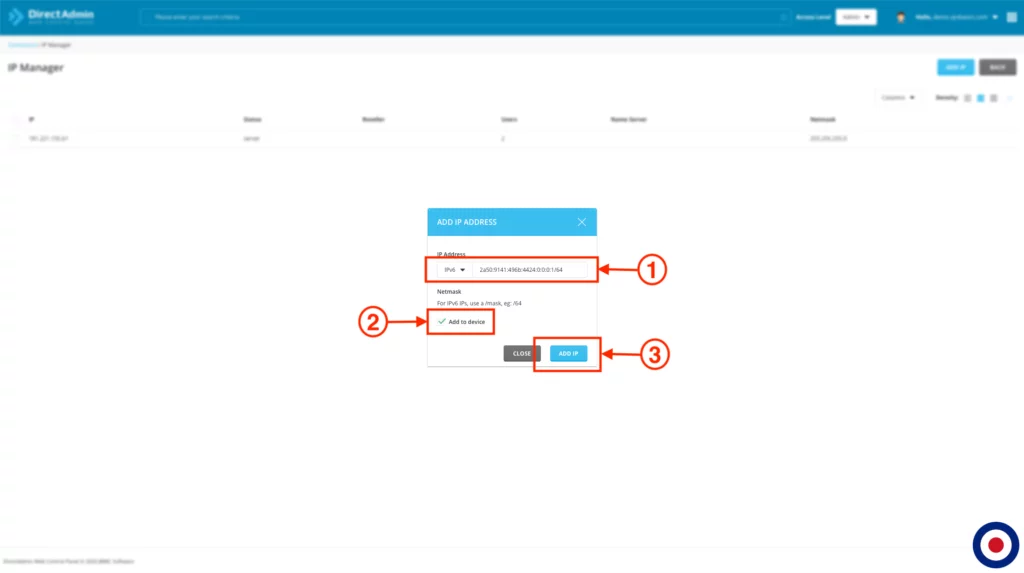
In the ADD IP ADDRESS modal, click IPv4 dropdown box under IP Address to change to IPv6. Enter the IPv6 Address you wish to add to DirectAdmin. Make sure you add /64 to the end of the address and the checkbox Add to device is ticked. Then click the ADD IP button.
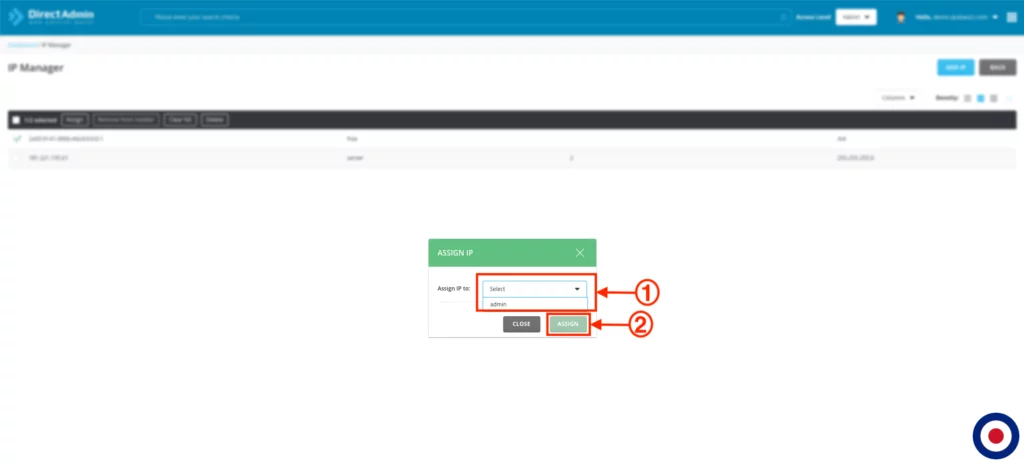
The IPv6 Address is now added to DirectAdmin and will show in the IP Manager dashboard. Now you will need to assign the IPv6 Address to a user. Select the checkbox next to the address and click the Assign button.
Now you will need to assign the IPv6 Address to a reseller. In the Assign IP to dropbox box select the reseller username to assign the address too and click the ASSIGN button. This process is the same even if you only have one reseller account on your server.
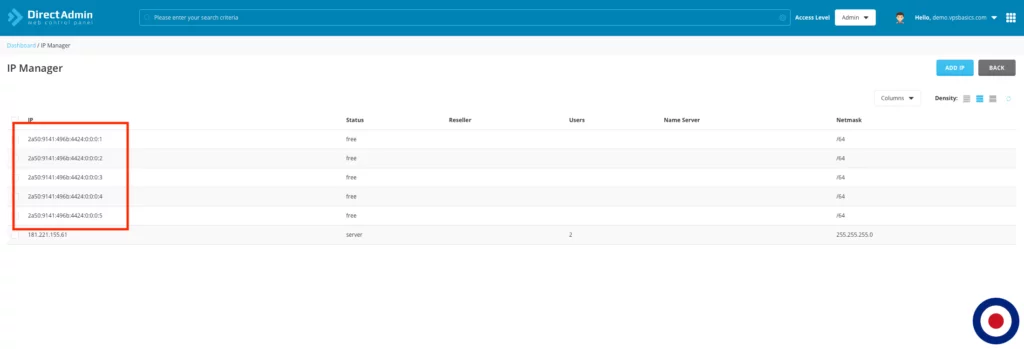
Now you will be returned to the IP Manager dashboard which will show the IPv6 Address has been assigned to the selected reseller.
That’s it. You have successfully added an IPv6 Address to your DirectAdmin server and assign it to an admin or reseller account. Next we will show you how to assign multiple IPv6 Addresses to an admin or reseller account.
Multiple IPv6 Addresses
In the same way you can add an individual IPv6 address, you can also add and assign multiple IPv6 addresses to an admin or reseller as well. Log into the IP Manager dashboard as before and add the IPv6 address. Continue to add as many IPv6 addresses as you want to the dashboard.
As before you can assign these IPv6 addresses to any reseller using the checkbox next to the address and click the Assign button. However, unfortunately at this time it is not possible to select multiple IPv6 addresses and assign them to a reseller, they must be assigned individually as before.
That’s it. You have successfully added multiple IPv6 Addresses to your DirectAdmin server and assign it to a reseller. Next we will show you how to assign an owned IPv6 Address to an individual user.
Assign IPv6 Address to User (Admin/Reseller)
From the DirectAdmin dashboard select Show All Users from the admin level or List Users from the reseller level dashboard options.
From the Show Users dashboard click on the Username of the account you want to assign an owned IPv6 address.
In the View User: USERNAME dashboard, click the blue ACTIONS button in the top right of the screen to show the dropdown menu and select Modify User.
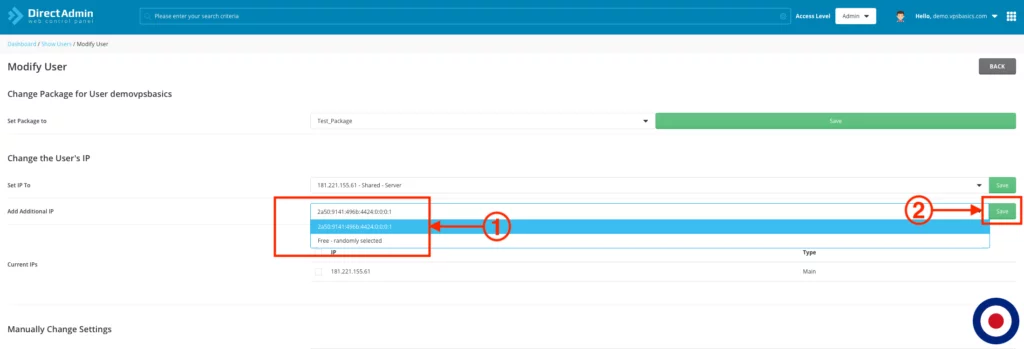
This will load the Modify User dashboard. Under the Change the User’s IP section you can assign an IPv6 to the user. You can either select an assigned IPv6 from the list or if you have more than one assigned IPv6 address you can assign a randomly selected address and the click the Save button.
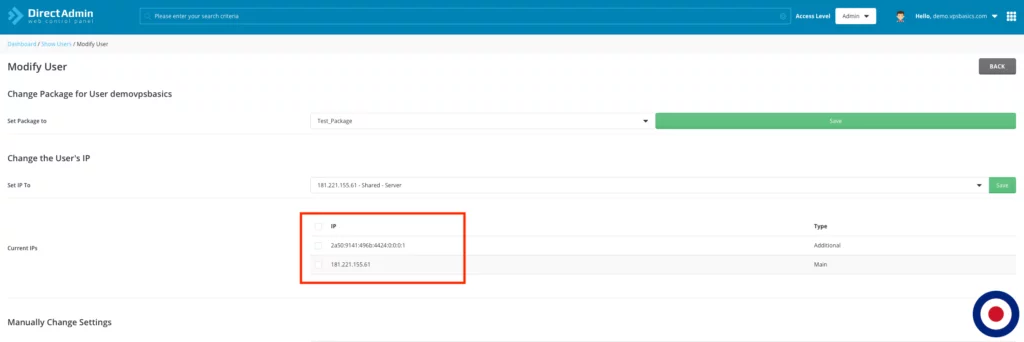
The newly assigned IPv6 address will now show in the Current IPs section.
Now in the Show All Users from the admin level or List Users from the reseller level dashboard you will see the newly assigned IPv6 Address below the server IP address for the user.
That’s it. You have successfully assigned an owned IPv6 Address to an individual user. Next we will show you how to add the owned IPv6 Address to an individual users domain name and update the DNS records.
Add IPv6 Address (User)
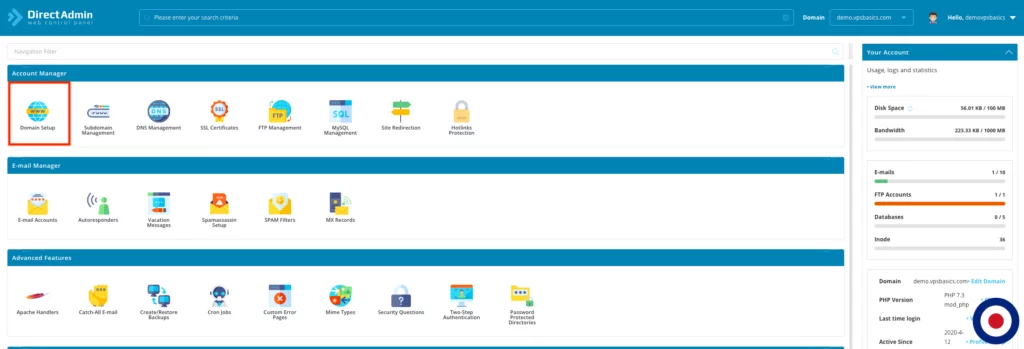
With an IPv6 Address assigned to your account, you will need to add the IPv6 address to your domain name and its update the DNS records. To do this log into your DirectAdmin dashboard. Once you have logged in, select Domain Setup.
In the Domain Management dashboard you will need to click on the domain name where you want to add the IPv6 address.
This will open the Modify Domain dashboard. In the top right of the screen you will see a link called Assigned IPs which you will need to click. If the link is not present in the dashboard it will mean you don’t have any additional IP addresses associated with your account. In this dashboard you can also setup forced redirection to include or exclude www prefix and HTTPS redirect with SSL.
In the Domain IPs dashboard, you will see the assigned IP associated with your account. Generally this will be the server or dedicated IP associated with your account. To add the IPv6 address click the Add IP in the top right of the screen.
This will open the Add Another IP modal where to can select the IPv6 address that has been associated with your account. Make sure that the Add DNS records for this IP checkbox is ticked as DirectAdmin will automatically apply all the necessary DNS amendments using the new IPv6 Address and the click the ADD IP button.
Now the newly added IPv6 address will show as being assigned to your domain name alongside the assigned server or dedicated IP address.
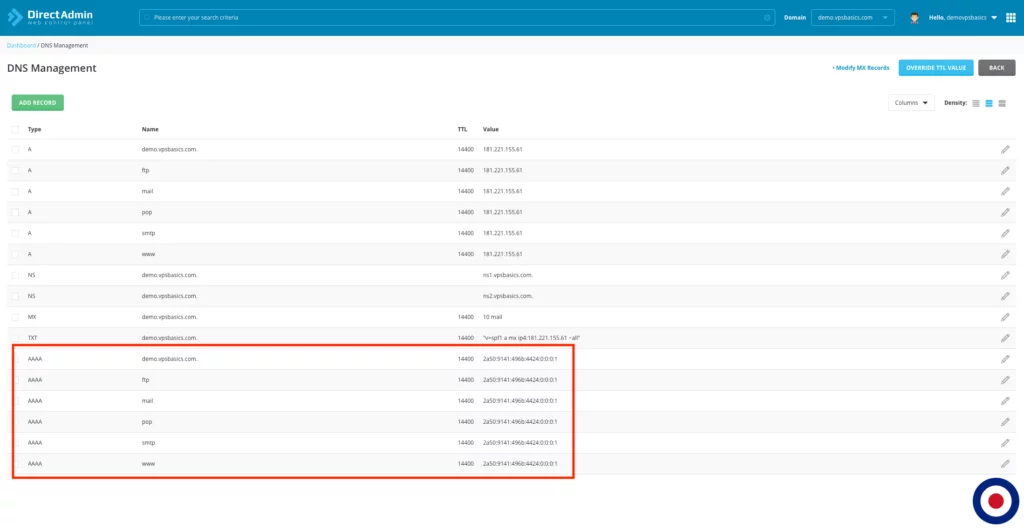
When you added the IPv6 address and enabled the checkbox add DNS records for this IP, DirectAdmin would have updated your domains DNS records to include the necessary AAAA records. You can verify this by clicking on the DNS Management icon from your DirectAdmin dashboard.
That’s it. You have successfully enabled IPv6 support in your DirectAdmin configuration file, added an IPv6 Address to DirectAdmin using the Multi-IP system, assigned an individually owned IPv6 address to a user, added multiple owned IPv6 Addresses to an admin or reseller account and applied the owned IPv6 address to a users domain name.

