A Mail Exchange (MX) record forms part of your websites DNS records and is essential for delivering email to your email address. Simply, an MX record is used to tell the world which mail servers accept incoming mail for your domain and where the email should by routed to. If your MX records are not set correctly you will be unable to receive email.
A correctly set MX record will look similar to the example below:
The number before the domain (mailhost1.vpsbasics.com) in the value column indicates the order of priority; the lower the number gives a higher priority. The sending server will always try using mailhost1 first because it has a priority of 10. If the server fails to deliver the email to mailhost1 is will try to deliver using mailhost2.
With the release of DirectAdmin v1.56.1 we can now set our own MX Record Templates. By default DirectAdmin includes an MX Record Template for GSuite, Zoho and Office365, which enables you to quickly change the DNS MX records to these providers without having to manually edit your DNS information.
Note
Before we start you will need to make sure you have your welcome email handy from MXRoute as that contains all the relevant information we will need for this guide.
In this guide we are going to show you how to add an MX Record Template for use with MXRoute. MXRoute is a popular option for email hosting with prices starting from just $40/year for unlimited domains and emails. We actually use MXRoute for our emails here at VPSBasics.
Check Current MX Templates
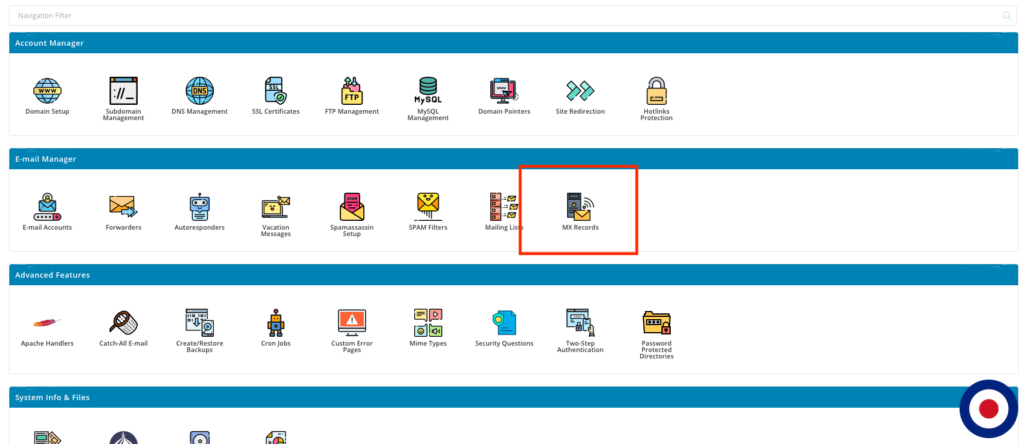
To check your current MX Templates in DirectAdmin you will need to log into your DirectAdmin dashboard. Once the dashboard has loaded select MX Records icon.
In the Options section of the Modify MX Records you will see a dropdown menu for the MX Template. Click the dropdown menu and the options for Google Suite MX, Office 365 and Zoho Mail will appear.
If we wanted to change the domains MX Record to point to Zoho, we can just select the Zoho Mail option and DirectAdmin will automatically update our MX DNS Records to point to mx.zoho.eu.
Set MX Template Option in directadmin.conf
We need to ensure that the Set remote MX Records option in our directadmin.conf is set. It should be enabled by default since v1.56 but we have found that sometimes it is missing. We can check to make sure the mx_templates= option is enabled using the following command:
cd /usr/local/directadmin
./directadmin c | grep ^mx_templates=
The command should return the value mx_templates=1, if it returns mx_templates=0 or nothing at all, you can update your directadmin.conf file using the following command:
echo "mx_templates=1" >> /usr/local/directadmin/conf/directadmin.conf
If you have added or changed the mx_templates= value, don’t forget to restart DirectAdmin for the changes to take effect. You can restart DirectAdmin using the following commands:
cd /usr/local/directadmin
echo "action=directadmin&value=restart" >> data/task.queue; ./dataskq d2000
OR
service directadmin restart
Create an MX Template for MXRoute
Now we will need to create an MX Template using the details from our MXRoute welcome email. We will create the template using the following commands and your favourite command line text editor. In our guide we will be using nano.
Firstly we need to navigate to the DirectAdmin templates folder using the following command:
cd /usr/local/directadmin/data/templates/mx/
If we browse this folder using the dir command you will see template files for google.com.txt, office365.txt, zoho.eu.txt. These files tell DirectAdmin to setup the DNS MX record by adding the relevant SPF and MX records.
We will need to setup a custom folder to use instead of using the mx folder directly for our MX Templates as they could be overwritten in future DirectAdmin updates. To create a folder called custom in our DirectAdmin templates folder we will use the following command:
mkdir custom
Once the folder has been created we need to navigate to its locations using the following command:
cd /usr/local/directadmin/data/templates/mx/custom/
Now we need to create our MX Template file. We will call this file mxroute.txt. You can call the file anything you want as DirectAdmin will use the function |?NAME=MXRoute| to display an easy to read name in the Modify MX Records dropdown menu. We will create the file using the following command:
nano mxroute.txt
In the MX Template file we will need to add the detail using the |MX_TEMPLATES_SELECT| token. An example MX Template file is shown below, you will need to change the details for the SERVERNAME and if you want to change the title displayed in DirectAdmin, the NAME.
|?NAME=MXRoute|
|?EXTRA_SPF=include:mxlogin.com|
|?SPF_STRICT=~all|
|?LOCAL_DOMAIN=no|
|DOMAIN|. 3600 IN MX 10 SERVERNAME.mxlogin.com.
|DOMAIN|. 3600 IN MX 20 SERVERNAME.mxlogin.com.
Once you have add the details to the MX Template file just save the file using CTRL O and then exit nano using CTRL X.
We need to change the owner of the file from USER to diradmin. We can do this using the following command:
chown diradmin. /usr/local/directadmin/data/templates/mx/custom/mxroute.txt
You have now successfully created an MX Template file called MXRoute that will pre-populate all the required DNS MX records for you to use your MXRoute email account within DirectAdmin.
Change Current MX Templates to MXRoute
To change your current MX Templates in DirectAdmin you will need to log into your DirectAdmin dashboard. Once the dashboard has loaded select MX Records icon.
In the Options section of the Modify MX Records you will see a dropdown menu for the MX Template. Click the dropdown menu and the options for Google Suite MX, Office 365, Zoho Mail and now MXRoute MX templates will appear.
Select the MXRoute MX Template and click Save button. DirectAdmin will now adjust your DNS record to add the MX records for MXRoute and updated the Modify MX Records to show the new details.
That’s it. You have now successfully added an MX Template for MXRoute to DirectAdmin and updated your DNS MX Records.


