When looking to secure your website or web applications, a good place to start is by exploring your existing HTTP Security Headers to ensure they are relevant but also in keeping with current best practices. Implementing HTTP Security Headers is in most cases relatively easy and can be completed by adding them to your websites .htaccess file which adds another layer of security by helping to mitigate attacks and security vulnerabilities.
Whenever a web browser requests a page from a website, the server will respond with the content requested alongside various HTTP Response Headers. These HTTP Response Headers contain various information such as content metadata like Content-Encoding which controls content compression, Cache-Control which tells the browser how long to cache the requests and responses or provides Status Codes such as 404 Not Found or 403 Forbidden in response to the web browser request. Alongside these HTTP Response Headers are HTTP Security Headers. These HTTP Security Headers tell your web browser how to handle the website’s content, such as the HTTP Strict Transport Security (HSTS) which will force all communication over the secure HTTPS protocol.
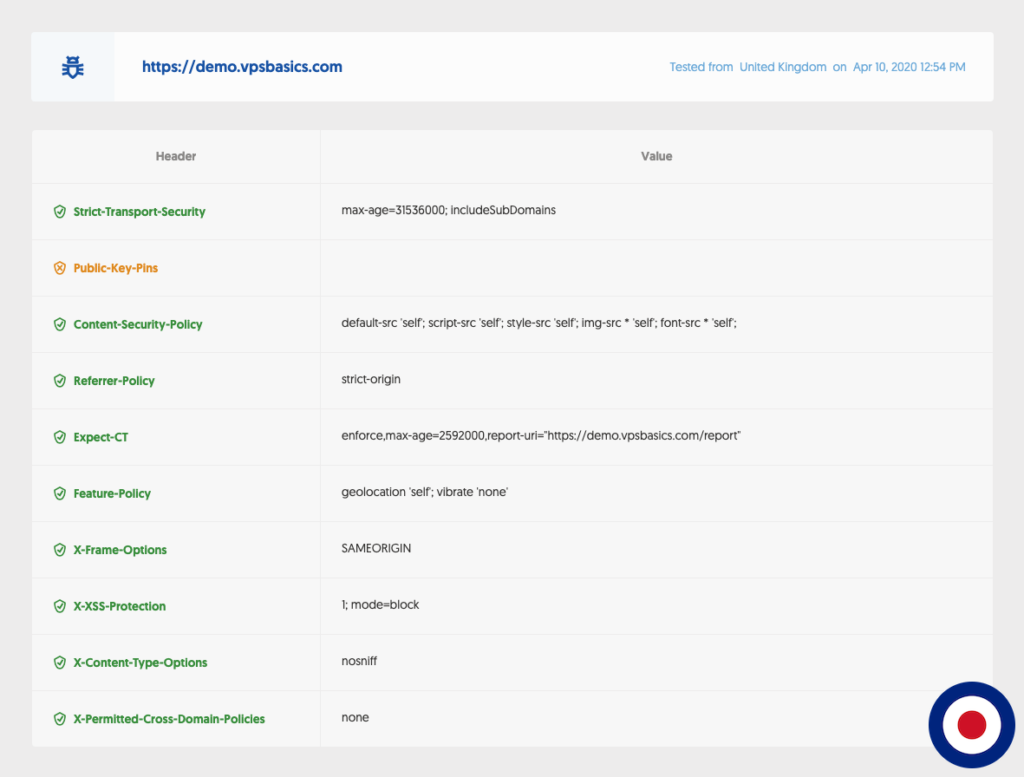
You can test your existing HTTP Security Headers using the Geekflare Secure Headers Test or the Security Headers website developed by Security Researcher Scott Helme. The Security Headers website will grade your website or web applications, based on current HTTP security header best practise, awarding anything from A+ down to an F grade. In the image below you can see the results of a test, we run using the Geekflare Secure Headers Test.
At the time of writing, there are currently 8 different HTTP Security Headers that we will explore below. We recommend that you understand what each one does, how it can protect your website or web application and implement them where possible.
- Content Security Policy – The Content-Security-Policy header provides an additional layer of security. This policy helps prevent attacks such as Cross Site Scripting (XSS) and other code injection attacks by defining content sources which are approved and thus allowing the browser to load them.
- Expect-CT – The Expect-CT header prevents wrongly issued certificates from being used by allowing websites to report and optionally enforce Certificate Transparency requirements. When this header is enabled the website is requesting the browser to verify whether or not the certificate appears in the public CT logs.
- Feature-Policy – The Feature-Policy header grants the ability to allow or deny browser features, whether in its own frame or content within an inline frame element <iframe>.
- Referrer-Policy – The Referrer Policy is a new header that allows a site to control how much information the browser includes with navigations away from a document and should be set by all sites.
- HTTP Strict Transport Security (HSTS) – The Strict-Transport-Security header is a security enhancement that restricts web browsers to access web servers solely over HTTPS. This ensures the connection cannot be establish through an insecure HTTP connection which could be susceptible to attacks.
- X-Content-Type-Options – The X-Content-Type-Options header prevents Internet Explorer and Google Chrome from sniffing a response away from the declared Content-Type. This helps reduce the danger of drive-by downloads and helps treat the content the right way.
- X-Frame-Options – The X-Frame-Options header provides clickjacking protection by not allowing iframes to load on your website.
- X-XSS-Protection – The X-XSS-Protection header is designed to enable the cross-site scripting (XSS) filter built into modern web browsers. This is usually enabled by default, but using it will enforce it.
When implementing HTTP Security Headers with OpenLiteSpeed you won’t be able to use the standard Apache header directives such as Header always set Strict-Transport-Security "max-age=31536000; includeSubDomains; preload" in the .htaccess file as OpenLiteSpeed is unable to read them. Instead, you will need to add them globally using the OpenLiteSpeed configuration file or individually using the DirectAdmin dashboard.
When using OpenLiteSpeed with DirectAdmin you will have noticed that access to the OpenLiteSpeed admin panel is set to read-only and you cannot change or edit any settings using the GUI. The reason for this is due to the way the DirectAdmin development team integrate OpenLiteSpeed. Usually, the OpenLiteSpeed configuration file is one file but DirectAdmin splits this configuration file into multiple include files stored in the /usr/local/lsws/conf directory. These all come together on the ./build rewrite_confs command to create one configuration file.
Important
It is not recommended to edit the OpenLiteSpeed configuration files in the /usr/local/lsws/conf folder directly. We recommend you edit these configuration files by creating a template, a direct copy of the original OpenLiteSpeed configuration file. All global OpenLiteSpeed templates are stored in the template folder /usr/local/directadmin/data/templates.
In this guide, we will show you how to add custom HTTP Security Headers to all the domains hosted on your OpenLiteSpeed DirectAdmin server by globally changing the virtualhost configuration file. If you want to add HTTP Security Headers to an individual domain only, you can change the virtualhost configuration file in the DirectAdmin dashboard using this guide.
Prerequisite
Through our testing of DirectAdmin and OpenLiteSpeed, we have noticed that the |CUSTOM3| section is missing from the openlitespeed_vhost.conf configuration file. We have contacted the DirectAdmin team to have the issue resolved. In the meantime, we will need to add the missing |CUSTOM3| section by editing the openlitespeed_vhost.conf template file to add that custom section. To create a copy of the openlitespeed_vhost.conf template and transfer it to the custom templates folder you will need to copy and paste the following code.
cp -p /usr/local/directadmin/data/templates/openlitespeed_vhost.conf /usr/local/directadmin/data/templates/custom/
With the template successfully copied we can now edit the file using the following command and your favourite command line text editor. In our example, we will be using nano.
nano /usr/local/directadmin/data/templates/custom/openlitespeed_vhost.conf
In the openlitespeed_vhost.conf file, you will need to add |CUSTOM3| in between the |CONTEXTS| and |REALMS| section. Using nano you can quickly find the relevant section using CTRL + W and type in CONTEXTS. Once you have edited the file it will look like the example below.
|CONTEXTS|
    |CUSTOM3|
|REALMS|
HTTP Security Headers (Global)
To add HTTP Security Headers globally to all new and existing Virtualhosts (domains) we will be using a custom OpenLiteSpeed template. In our example, we are using the CUSTOM3 location which appears in context{} section of the OpenLiteSpeed Virtualhost file for each domain. The different CUSTOM sections in the OpenLiteSpeed virtualhost file are listed below:
- CUSTOM1: Appears at the very top of the template, before setting the variables.
- CUSTOM2: Appears in the scripthandler{} section.
- CUSTOM3: Appears in the context{} sections.
- CUSTOM4: Appears in the phpIniOverride{} section.
- CUSTOM5: Appears in the rewrite{} section.
- CUSTOM6: Appears in the vhssl{} section.
- CUSTOM7: Appears at the end of the virtualHost.
- CUSTOM8: The very last entry.
Before we can add HTTP Security Headers globally we will need to create the CUSTOM3 template file, make sure it is owned by the user diradmin and then edit the file using the following commands.
cd /usr/local/directadmin/data/templates/custom/
touch openlitespeed_vhost.conf.CUSTOM.3.pre
chown diradmin:diradmin openlitespeed_vhost.conf.CUSTOM.3.pre
nano openlitespeed_vhost.conf.CUSTOM.3.pre
In the openlitespeed_vhost.conf.CUSTOM.3.pre file you will need to add your required HTTP Security Headers in between the context wrap. In the examples below, we have added headers for Strict-Transport-Security, X-Content-Type-Options, X-XSS-Protection, X-Frame-Options, Referrer-Policy. By setting these headers you will achieve a B rating using the securityheaders.com website.
context / {
    location  		$DOC_ROOT/
    allowBrowse   	1
    extraHeaders 	Strict-Transport-Security: max-age=31536000; includeSubDomains; preload
  }
  context / {
    location      	$DOC_ROOT/
    allowBrowse   	1
    extraHeaders 	X-Content-Type-Options nosniff
  }
  context / {
    location   		$DOC_ROOT/
    allowBrowse  	1
    extraHeaders  	X-XSS-Protection 1;mode=block
  }
  context / {
    location		$DOC_ROOT/
    allowBrowse  	1
    extraHeaders	X-Frame-Options SAMEORIGIN
  }
  context / {
    location  		$DOC_ROOT/
    allowBrowse 	1
    extraHeaders 	Referrer-Policy strict-origin
  }
To achieve an A+ rating you will also need to implement the Expect-CT, Feature-Policy and Content Security Policy HTTP headers. In the example below, we have illustrated how to set these headers, however, they are individual to each website and need to be adjusted accordingly.
context / {
    location 		$DOC_ROOT/
    allowBrowse 	1
    extraHeaders	Expect-CT enforce, max-age=21600
}
context / {
    location		$DOC_ROOT/
    allowBrowse    1
    extraHeaders	Feature-Policy geolocation 'self'; vibrate 'none'
}
context / {
    location		$DOC_ROOT/
    allowBrowse 	1
    extraHeaders	Content-Security-Policy default-src https:; font-src https: data:; img-src https: data:; script-src https:; style-src https:;
}
Note
We recommend that you implement these headers above individually to each domain using the customise openlitespeed.conf configuration option in the DirectAdmin dashboard. For more information see the section below.
Once you have added your required HTTP Security Headers you will need to rewrite the existing domains configuration files to include the new headers using the following command.
cd /usr/local/directadmin/custombuild
./build rewrite_confs
That’s it. You have now successfully secured your website or web application by implementing recommended HTTP Security Headers, globally to each virtualhost configuration file in OpenLiteSpeed. If you add any new domains to DirectAdmin they will automatically be created with the existing HTTP Security Headers.
HTTP Security Headers (Individual)
To add custom HTTP Security Headers to an existing OpenLiteSpeed virtualhost (domain) we will need to edit the domains HTTPD configurations file. After logging into the DirectAdmin dashboard you will need to select Custom HTTPD Configurations.
Then you will need to select the openlitespeed.conf file listed next to the domain in the Custom HTTPD Configurations panel.
This will load the View Domain Configuration panel. In this panel, DirectAdmin will display the entire contents of the openlitespeed.conf file for your selected domain. Now you will need to select the Customize button in the top right.
This will load the Customize Configuration panel. In this panel, you can add extra custom configurations for your domain using the Custom Tokens section. In our example, we are using the CUSTOM3 location which appears in context{} section of the OpenLiteSpeed Virtualhost file for each domain. The different CUSTOM sections in the OpenLiteSpeed virtualhost file are listed below:
- CUSTOM1: Appears at the very top of the template, before setting the variables.
- CUSTOM2: Appears in the scripthandler{} section.
- CUSTOM3: Appears in the context{} sections.
- CUSTOM4: Appears in the phpIniOverride{} section.
- CUSTOM5: Appears in the rewrite{} section.
- CUSTOM6: Appears in the vhssl{} section.
- CUSTOM7: Appears at the end of the virtualHost.
- CUSTOM8: The very last entry.
Now select the CUSTOM3 tab. In this tab, you will need to add the relevant HTTP Security Headers for your domain inside the context / {} wrapper. In the examples below, we have added headers for Strict-Transport-Security, X-Content-Type-Options, X-XSS-Protection, X-Frame-Options, Referrer-Policy. By setting these headers you will achieve a B rating using the securityheaders.com website.
context / {
    location  		$DOC_ROOT/
    allowBrowse   	1
    extraHeaders 	Strict-Transport-Security: max-age=31536000; includeSubDomains; preload
  }
  context / {
    location      	$DOC_ROOT/
    allowBrowse   	1
    extraHeaders 	X-Content-Type-Options nosniff
  }
  context / {
    location   		$DOC_ROOT/
    allowBrowse  	1
    extraHeaders  	X-XSS-Protection 1;mode=block
  }
  context / {
    location		$DOC_ROOT/
    allowBrowse  	1
    extraHeaders	X-Frame-Options SAMEORIGIN
  }
  context / {
    location  		$DOC_ROOT/
    allowBrowse 	1
    extraHeaders 	Referrer-Policy strict-origin
  }
To achieve an A+ rating you will also need to implement the Expect-CT, Feature-Policy and Content Security Policy HTTP headers. In the example below, we have illustrated how to set these headers, however, they are individual to each website and need to be adjusted accordingly.
context / {
    location 		$DOC_ROOT/
    allowBrowse 	1
    extraHeaders	Expect-CT enforce, max-age=21600
}
context / {
    location		$DOC_ROOT/
    allowBrowse    1
    extraHeaders	Feature-Policy geolocation 'self'; vibrate 'none'
}
context / {
    location		$DOC_ROOT/
    allowBrowse 	1
    extraHeaders	Content-Security-Policy default-src https:; font-src https: data:; img-src https: data:; script-src https:; style-src https:;
}
Once you have entered your required HTTP Security Headers you can click the Save button. Now DirectAdmin will rebuild the openlitespeed.conf file for your selected domain. Once this has completed click the View in the top right of the screen to return to the View Domain Configuration panel

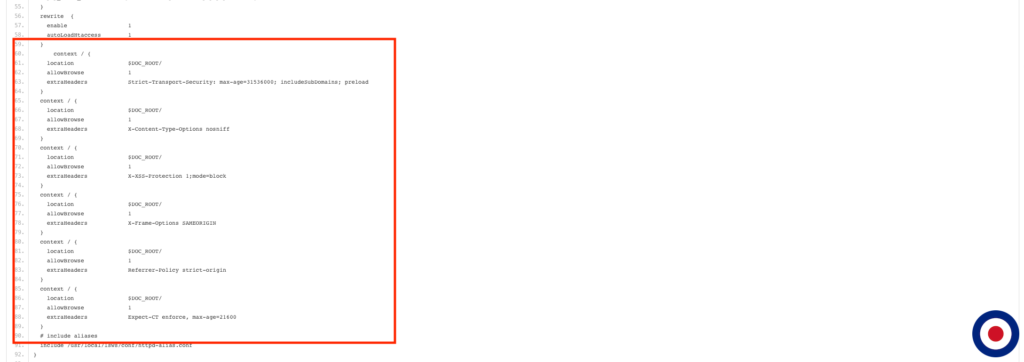
If you scroll down the openlitespeed.conf file for your selected domain you will see the HTTP Security Headers have been added to the domains OpenLiteSpeed configuration file.

That’s it. You have now successfully secured your website or web application by implementing recommended HTTP Security Headers, to the OpenLiteSpeed virtualhost configuration file for your domain. To add HTTP Security Headers to other domains you will need to complete the steps above for each domain required.


2 Comments for How to Add HTTP Security Headers with OpenLiteSpeed and DirectAdmin
Hi, thanks for this post. I was wondering if it could be shortened a bit and I’ve found a solution; we can use HereDoc:
extraHeaders <<<END
… multiple
… headers
END
You can shorten the headers down and use the
extraHeaders <<<END_extraHeaderstag without any issues. The headers are only written like this in the guide for easy implementation. See the example below,context / {location $DOC_ROOT/
extraHeaders <<<END_extraHeaders
Strict-Transport-Security: max-age=31536000; includeSubDomains; preload
X-Content-Type-Options nosniff
X-XSS-Protection 1;mode=block
X-Frame-Options SAMEORIGIN
Referrer-Policy strict-origin
END_extraHeaders
}
Kind regards,
VPSBasics