WordPress uses Cron Jobs to schedule tasks on a fixed periodic times, dates and/or intervals on your website. For example, WordPress will use Cron Jobs for scheduling posts you may have written and check for updates to WordPress core, themes or plugins.
The Cron Job in WordPress, is called WP-Cron and is used to simulate a system Crons such as running system backups or cleaning /tmp/ directories. The downside to WP-Cron is that it runs on every page load and if your website has a significant amount of traffic the built-in WordPress cron handler can start to impact upon your page load times and user browsing satisfaction.
By using the default WP-Cron task websites with high-traffic and particularly highly demanding websites have seen real performance issues. WP-Cron only runs on each page load and not continuously meaning if you have a high-traffic website each time someone loads a webpage WP-Cron will need to utilise a PHP worker. If your your server has already allocated all the workers the cronjob will not execute until a worker becomes available and will hang. The same is true of websites with low-traffic, meaning that as there are no page loads the WP-Cron task will not fire and therefore scheduled tasks such as new posts will be missed.
In this guide we will show you how you can disable the WordPress Cron Job (wp-cron.php) and transfer the job using a system cron in cPanel or DirectAdmin to enable that boost to your WordPress website performance and ensure scheduled posts are actioned when you wanted.
How to Disable WP-Cron
In order to disable WP-Cron we will need to edit the wp-config.php file stored in your website public_html folder. You can either use your favourite FTP program to upload the file or use the file managers built into either your DirectAdmin or cPanel account to edit and update the file.
Open the wp-config.php files and just before the line /* That’s all, stop editing! Happy blogging. */ insert the following command:
define('DISABLE_WP_CRON', true);
/* That’s all, stop editing! Happy blogging. */
How to Schedule System Cron
We have now disabled WP-Cron from activating on each page load but will need to replace this with a system cron to schedule wp-cron.php to ensure WordPress still checks for scheduled posts or updates to WordPress core, themes or plugins. Below you will find detail of how to schedule a system cron in DirectAdmin or cPanel.
Use DirectAdmin to Schedule System Cron
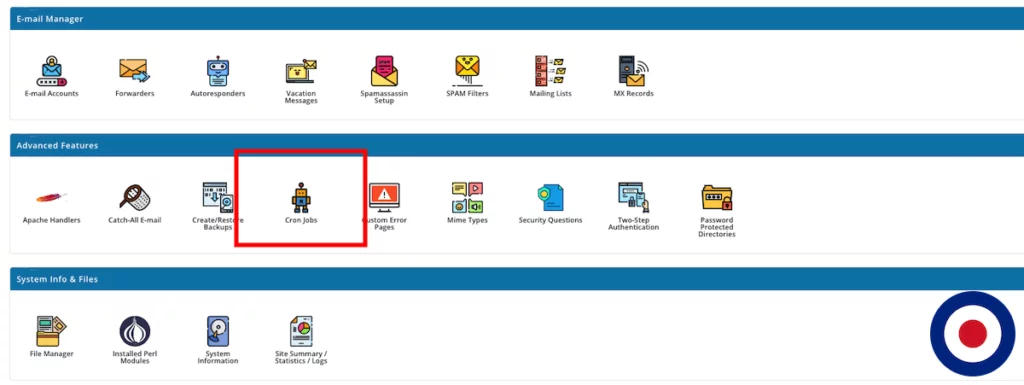
Firstly you will need to log into your DirectAdmin account dashboard. Scroll down to the Advanced Features section where Cron Jobs is located and select it.
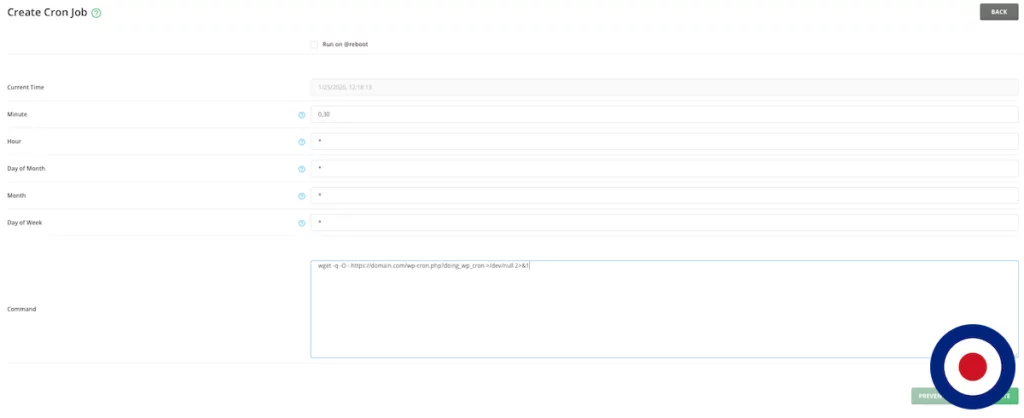
This will open the Create Cron Job screen. Here you can create a cron job to run at reboot or alternatively select a schedule, such as twice per hour or once per day. Be sure to check with your hosting provider as they will have limits in place on how often you can run cron jobs but you will find most will be happy with the cron job running twice per hour.
In the image below we have set the cron job to run every 30 minutes (twice per hour). In the Command section you will need to place the following command:
wget -q -O - https://domain.com/wp-cron.php?doing_wp_cron
Make sure you replace https://domain.com with your actual domain name. If you want to prevent your DirectAdmin account emailing you every 30 minutes regarding the WordPress cron task you can select the Prevent E-mail button which will automatically add >/dev/null 2>&1 to the end of your command.
Once you have entered the command to schedule the system cron click on the Create button in the bottom right.
Now DirectAdmin will process the cron job and redirect you back to the main Cron Job screen where you will see the cron has been set for every 30 minutes (twice per hour) using the command we entered earlier.
Thats it, you have now successfully disabled the WordPress cron task (WP-Cron) and replace it will a system cron task in your DirectAdmin account.
Use cPanel to Schedule System Cron
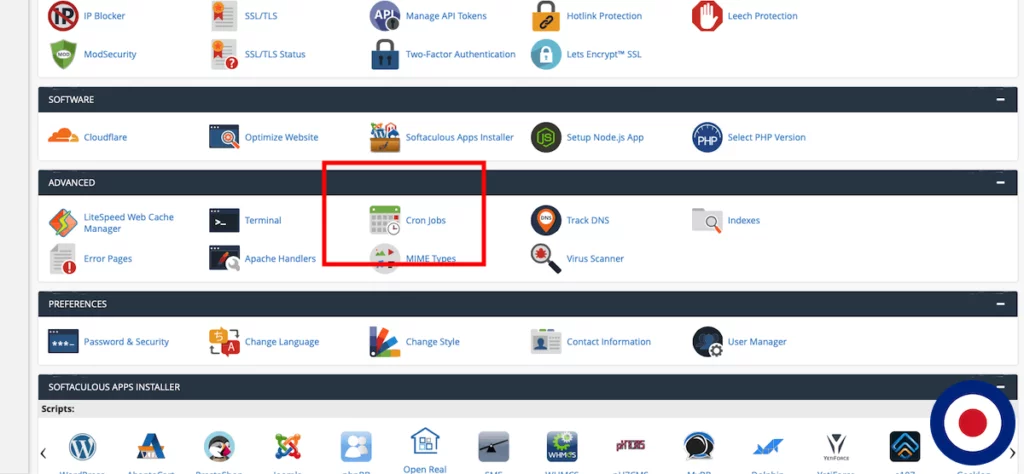
Firstly you will need to log into your cPanel account dashboard. Scroll down to the Advanced section where Cron Jobs is located and select it.
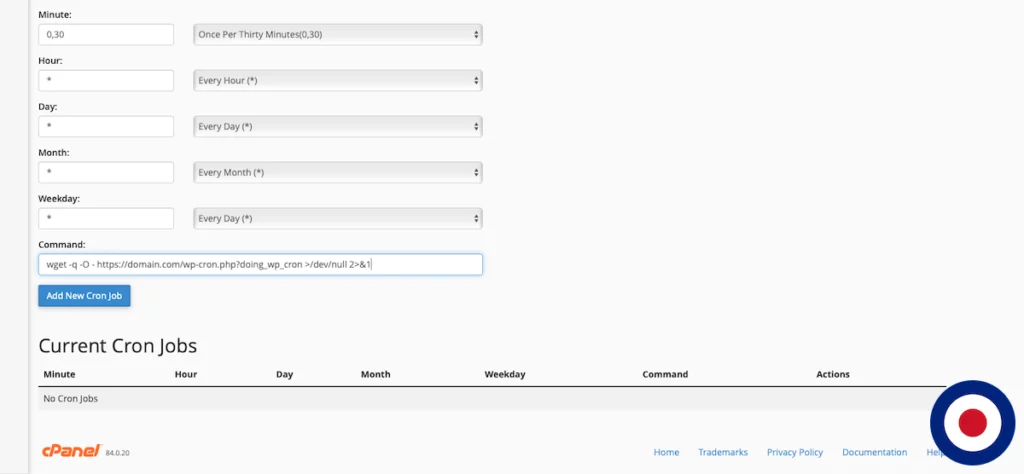
This will open the Create Cron Job screen. Here you can create a cron job to run from a number of different pre-defined schedules, such as twice per hour or once per day. Be sure to check with your hosting provider as they will have limits in place on how often you can run cron jobs but you will find most will be happy with the cron job running twice per hour.
In the image below we have set the cron job to run every 30 minutes (twice per hour). In the Command section you will need to place the following command:
wget -q -O - https://domain.com/wp-cron.php?doing_wp_cron >/dev/null 2>&1
Make sure you replace https://domain.com with your actual domain name. Once you have entered the command to schedule the system cron click on the Add New Cron Job button below the command section.
Now cPanel will process the cron job and under the Add New Cron Job button you will see the cron has been set for every 30 minutes (twice per hour) using the command we entered earlier.
Thats it, you have now successfully disabled the WordPress cron task (WP-Cron) and replace it will a system cron task in your cPanel account.




2 Comments for How to Boost WordPress Performance by Disabling WP-Cron
thanks , helped a lot
Hi Anisur
We’re glad you found this guide useful and thank you for your feedback.
Kind Regards
VPSBasics